Flutter CI/CD with Codemagic

Roshan Chapagain
February 28, 2021
6 minutes min read
Do you spend too much time deploying your Flutter app to the apple and android store instead of adding awesome features? Do you sometimes forget to deploy the app or just want a streamlined workflow you can set it up with Codemagic? Read on.

Codemagic allows you to easily integrate CI/CD for Flutter, essentially free. Their free plan provides a 500 minute build time each month. So, if you use them properly and efficiently the free plan will be enough.

What do you need?

  • A project hosted on Github, GitLab or Bitbucket
  • Google play console if you are planning to release your application in the Playstore

Let’s Go

1. Sign Up

You can easily signup with your Github, Bitbucket or Gitlab account.

I am signing up with my Bitbucket account.

Signup to Codemagic

After you have signed up. You see all the projects hosted by the provider associated with the account.

What if you do not see the project you are trying to use?

You can simply put the repository URL.  

You will have to provide the username and the password if you are accessing a Private repository.

And voilà.

Creating a workflow

Select Flutter App

Select Flutter App
Select Flutter App

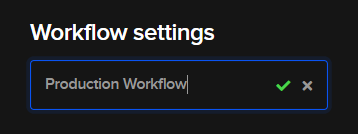
Let us assume we are building a production workflow

The right menu is self-explanatory. What you might consider is naming your workflow for future use.

Naming your CI/CD Workflow
Naming Your Workflow

2. Build Triggers

Build triggers are as the name suggest, triggers that start the build.

You can set the build to start whenever:

  • You push to a specific branch
  • On pull request update
    • For this, you can specify whether each branch pattern matches the source or the target branch of the pull request
  • On tag creation

Here I am setting the build to start when I push to the production branch.

Setting up branch

Instead of entering the exact name of the branch, you can also use wildcard symbols to select more than one branch with one pattern.

Select “Show Pattern Examples” for how to.

Additional Patterns

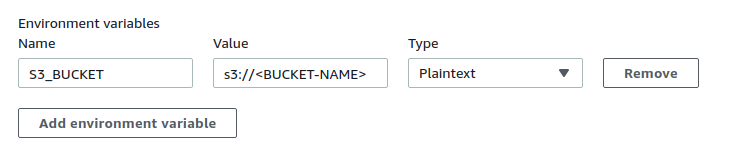
3. Environment Variables

Environment Variables can be useful when you might have to pass a secret api key to your application or something similar.

Using Environment Variables

We are not going to be using any environment variables for the sake of this tutorial.

4. Dependency Caching

Codemagic allows storing dependency storing so you can speed up your builds.

PathDescription
$FLUTTER_ROOT/.pub-cacheDart cache
$HOME/.gradle/cachesGradle Cache
$HOME/Library/Caches/CocoaPodsCocoaPods Cache
Common Dependency Paths
Dependency Caching

For the Next Steps..

For the next three steps, Codemagic allows you to add a ‘Post script’ and ‘Pre Script’. ‘Post Script’ allows you to add scripts that are set to run before the particular phase and after the completion of the previous phase. Whereas, ‘Post script’ allows you to add scripts that are set to run after the particular phase has completed and before the next phase.

You can use these to do different things like:

  • Creating a directory and storing environment variables
  • Starting emulator beforehand and more
Post and Pre Scripts

5. Test

Codemagic runs your tests for you. It even does static code analysis with flutter analyze. You have to “Enable Flutter analyzer” for this.

Integration Testing

You can select one of the several options for running integration testing during the build.

  • Ios Simulator
  • Android Emulator
  • AWS Device Farm
Testing

6. Build

There are multiple settings that you can set before starting your build.

Build Section

You can change Flutter, Xcode and CocaPods version. You can also easily select what you are building your application for. And if you are building for android, the build format.

Build Mode

The build arguments allow you to do things like build versioning and choosing an alternate main file to run your project.

7. Publish

Publish

Codemagic allows easy publishing of all the generated artifacts to external services. Covering publishing thoroughly is a whole blog in itself. So we will only look onto the android sides of things for now.

For android publishing, the first thing you have to do is Android code signing. Find how to do that here.

Android Code Signing

Then, select Android Code Signing. Upload your keystore file, set keystore password, key alias and key password.

Add keystore

For publishing into Google Play. You have to upload a credentials.json. Find how to get it here. Set the appropriate track.  You can also set the Update Priority and Rollout Fraction within Codemagic.

Google Play Publishing

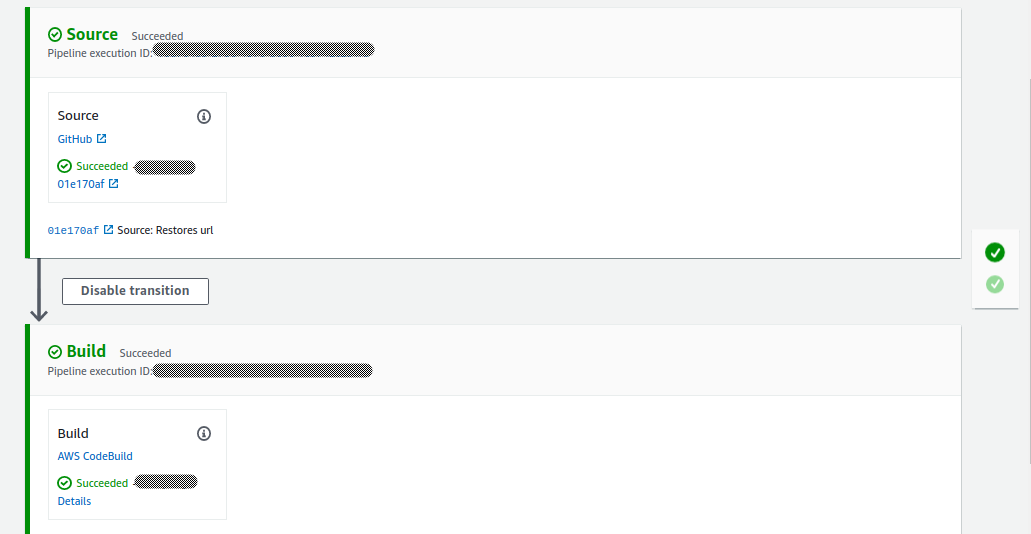
Congrats. You are done with setting CI/CD for flutter using Codemagic. You can manually start a build. By going to your Codemagic home page and clicking on Start new build, and choosing the appropriate branch and recently created workflow.

Starting Build
BACK TO BLOG

Automate Vue Js deployment to AWS S3 bucket with CodeBuild

Bibhuti Poudyal
January 10, 2021
5 minutes min read
Deployment to your AWS S3 bucket can be a hassel. Automate this process with CodeBuild.

Prerequisites

  1. VueJS project on github
  2. Aws account

Steps

  • Create AWS bucket
  • Configure bucket for static hosting
  • Buildspec file
  • Create and configure code pipeline

Create AWS bucket

Create a bucket with your domain name.

Image for post

The bucket name must be unique.

Image for post

After the bucket is created; go to its detailed view. Click on the properties tab then select “Static website hosting”. Select the first option “Use this bucket to host a website”.

Image for post

Fill out the information as shown in the screenshot above and hit save.

As Vuejs is a single page application the error is also handled by index.html.

Configure bucket for static hosting

Next: the bucket needs to be accessed by other AWS services like CodeBuild, Lambda etc. For this purpose bucket policy needs to be configured.

Image for post

Under permissions goto “Bucket Policy” tab which contains a blank editor. Copy and paste the following configuration into it.

Replace the ARN under Resources with your bucket ARN.

ARN: Amazon Resource Name

Alternatively, beneath the editor click on the “Policy generator” link and generate the policy.

This finishes the S3 bucket setup.

Buildspec File

Before diving into the AWS CodePipeline, let’s talk about the buildspec file. Create a “buildspec.yml” file at the root of your Vuejs project and paste the following contents.

This section is just for understanding. Skip if you like.

Here you can see 4 phases:

install: Includes commands to run during installation. It installs/upgrades npm, pip and awscli required for further process.

pre_build: Commands to run before build. Install the dependencies by running npm install

build: command to build Vuejs project.

post_build: command to sync dist directory with S3 bucket. You need to change the build directory if the project has been built somewhere else. $S3_BUCKET is the ENVIRONMENT variable which we will configure later.

Create and configure AWS CodePipeline

It is the crucial step where we connect the GitHub repo with the S3 bucket and configure codepipeline for automatic deployment. At this step make sure you have pushed the latest changes to Github.

I have mentioned only Github here. As of now CodePipeline supports Github and BitBucket.

The pipeline for Vuejs project would be pretty simple; with two phases.

  1. Source: Gets the latest commit from Github’s appropriate branch
  2. Build: Install dependencies, build project and sync with S3

Navigate to AWS CodePipeline and click Create pipeline.

Image for post

At the create pipeline wizard, input pipeline name and service role.

Image for post

Expand the advanced tab.

Image for post

Artifact store: Custom location

Bucket: select the recently created bucket

Click Next

Image for post

Select GitHub. It may ask you to login and grant access. Then click connect.

Image for post

Select the appropriate Repository and branch. Leave GitHub Webhooks as default and click Next. Learn more about Github webhooks here.

Image for post

At “Add build stage”, select AWS Codebuild. Then click on “Create Project”. It will open a project creation wizard on a new window.

Image for post

On the Project creation form. Fill up the values as follows.

  • Project name: your project name
  • Environment image: Managed Image
  • Operating System: Ubuntu
  • Runtimes: Standard
  • Image: aws/codebuild/standard:4.0
  • Image version: Always use the latest image for this runtime version
  • Environment type: Linux
  • Service role: New service role

Expand the Additional configuration. Scroll to Environment variables. Insert S3_BUCKET on name field and name of the bucket on value field. That value will be used by the buildspec.yml file created earlier.

Image for post

Scroll and select “Use a buildspec file” on Buildspec section.

Image for post

Click Continue to Codepipeline. It will then close the window and return back to CodePipeline configurations with a success message.

Image for post

Skip the add deploy stage. Finally, review your configurations and click Create Pipeline.

Image for post

Now you should see the source and build stage being executed.

Image for post

In order to test the automatic deployment, push new commits to GitHub and wait for source and build phases to complete.