Snake game in 110 Lines of Code

Bibhuti Poudyal
January 10, 2021
8 minutes min read
Build a Snake game in 110 Lines of Code using just Html and JS.

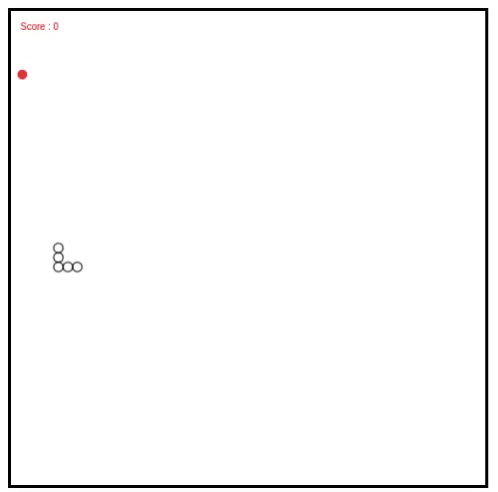
In this article, I will build a simple snake game in JavaScript from scratch. The player can control the snake by the keyboard. Whenever the snake collides with food(a red circle), it gets 1 point and food moves to a random position.

You can view the finished application here. And the source code is here.

Image for post
Demo

The requirements for this application are basic knowledge of HTML, JavaScript, and some prior knowledge of HTML canvas.

The file structure of the application looks something like this:

  1. index.html: contains the HTML code
  2. script.js: contains the main logic of the application
Image for post
index.html file

The canvas is given the height and width of 500px and border-style ‘solid’ so we can view it clearly. It is given the id ‘canvas’ to reference it from script.js file That’s all for HTML. Open it in your browser and you will see an empty white box. That’s our canvas.

Now let’s move on to the scripting part. Initially, we get reference to the canvas so that we can draw on it.

Image for post
Reference canvas in HTML from JavaScript

In order to use canvas, we get reference to the context of the canvas. The parameter ‘2d’ is passed, which specifies that we are working in 2D. Next, we declare some variables which will hold our snake, food, score, direction, speed etc. Information of each variable is in the comments.

Image for post
Basic JavaScript setup for the game

Now we have our variables ready, we initialize our snake. Initially, snake array is empty. It’s supposed to contain the coordinates of the snake. Let’s do that now.

Image for post
Re-render the screen every 100 milliseconds

The for loop goes from 0 to length. Each time it adds a circle to the snake array so that the circle lies exactly to the left of the previous circle. For that, the x-coordinate of the circle is decreased each time by (size*2) and the y-coordinate is kept constant. After the snake is made ready we call the setInterval function which takes two parameters: a function to call each interval and an integer number which is the interval in milliseconds. In our case, it’s 100. i.e the function draw is called once in every 100 milliseconds.

The draw function is the main part of our program where the magic happens. In every 100 milliseconds, the draw function is invoked which clears the canvas, updates the position of the snake based on its direction, and redraws it. This happens so quickly that we don’t even notice. At the same time, it checks the collision of snake and food and updates the score too.

Image for post
the draw function

ctx.clearRect() method clears the canvas before redrawing. The successive for-loop loops over the circles of the snake from its tail to head (from the last index to the first index). If the current index is not the head, it sets it to its preceding circle. i.e. the last circle takes the position of second last circle, second last takes the position of third last, and so on… so that the snake seems as if it’s moving.

If the current index is head, first it checks the direction(at switch case) and increases the coordinate of the circle according to that direction.

Right: increase x-coordinate

Left: decrease x-coordinate

Up: decrease y-coordinate

Down: increase y-coordinate

After adding and subtracting the coordinate it should be drawn on the canvas so that the player can see the moving snake. The code below draws each circle of the snake with its updated coordinates.

Image for post
draw snakes with arc

Now the snake is drawn on the canvas. But it’s not the only thing to draw, we still need to draw the food and score. Drawing the food is similar to drawing the circles of the snake. In case of food, we fill it with red color. The next issue is checking the collision. The function checkCollission() does the job and returns a Boolean value. It takes two circles as its parameter, in our case, it’s the snake’s head and the food.

Image for post
Check for collision

The logic for the above function is quite simple. It what we studied in our school. First, we take the distance between the central points of two circles and compare it with the sum of their radii. If it is greater: no collision; else: they collided. The illustration will clear the concept.

Image for post
check distance between centers of two circles to detect collision

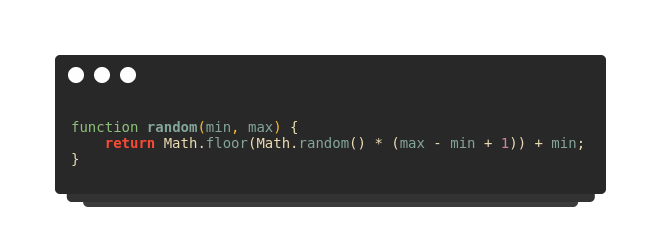
If checkCollission() returns true, first the score is increased and the food is placed on any random position between 0 to width/height of the canvas. The random function takes two parameter min, max, and gives a random number between them.

Image for post
random function

Now we have come to the end. The last piece of the puzzle is the keydown event handler. We need to control the direction of the snake according to the keyboard button pressed.

Image for post
handle keyboard events

The onkeydown handler is invoked whenever a key is pressed down. Then we check if the key is rightleftup or down arrow and assign the respective direction. 373839 and 40 are the keyCode (ASCII value) for left, up, right and down arrows. Now save the file and open it in your browser.

The code doesn’t work yet. It’s because, for the code to work the timer should start, which we haven’t done yet. As you have noticed, the timer is set in init() function. So call the init function at the last line of your code, save it, and refresh the browser. You can see a moving snake that you can control with the keyboard’s arrow keys.

Happy Coding !

BACK TO BLOG

Migrate vue-i18n to poeditor

Bibhuti Poudyal
January 10, 2021
5 minutes min read
Internationalization is a basic feature for web apps having users from different corners of the world. vue-i18n makes the process very smooth to implement internationalization into VueJs web apps. Poeditor is another tool that provides a smooth translation workflow.

Internationalization is a basic feature for web apps having users from different corners of the world. vue-i18n makes the process very smooth to implement internationalization into VueJs web apps. Poeditor is another tool that provides a smooth translation workflow.

Recently I ‘d a chance to migrate the Vue application (with local translation data) to make it work with Poeditor’s API.

In case you don’t know about poeditor. It provides a smooth translation workflow. And also

  • Translators can manage your translations
  • It gives simple REST API to access the data

For more details visit poeditor.

The technique mentioned in this article works for this particular scenario:

  • You already have translation working from local translation files
  • You don’t want to change any of the current workflow
  • You want to take advantage of all the cool features of poeditor

This article suggests an architecture that perfectly fulfills the above requirements.

Vue.js + Node.js Proxy + Poeditor API

The first step would be to import the existing vue-i18n’s JSON translation file to poeditor.

Import current translation to poedditor

As you may have noticed, the import process flattens the nested JSON object. If your translation data is only 1 level deep, this shouldn’t be an issue. In case of nested data, note the context below translation terms. It will be used later to gain the original nested structure.

Now lets look at the changes in Vue application. This solution is a derived version of vue-i18n’s Lazy Loading guide.

This is how default i18n file looks like, before the change.

The current structure needs to be changed in order to fetch data from the API. And it needs to export two things

  • the i18n instance
  • loadLanguageAsync function

The loadLanguageAsync function loads translation data from the server and sets the data and locale accordingly. setI18nLanguage sets i18n’s locale and updates lang attribute of html tag with new translation. silentTranslationWarn property enables/disables console warnings.

i18n.js file after the required changes:

When we have the functions ready we need to decide a best place to call the function. If your language depends on the URL, you should probably follow the vue-i18n’s Lazy loading guide; it asynchronously loads the translation before each route change according to route params.

For our case, we need to get the translation only once when the app loads. So App.vue seems to be the best place to call this function.

Image for post
at App.vue

Inside the created function new translations are loaded. The loading computed property tells whether the translation has been loaded or not. You can use this property to show loading message until the translation loads.

Image for post

Usage of loading computed property at App.vue

That should take care of everything on the front end.

Backend Proxy

For back-end I have chosen NodeJS and Express as it allows to create API very quickly.

The server will be responsible for:

  • Request data from poeditor
  • Format locale data to match vue-i18n structure

The reason for using proxy: Poeditor REST API is protected with CORS. So it doesn’t allow frontend application to request data. Moreover, the data needs to be formatted which can be an overhead on the browser. Formatting on the server is faster and it can be cached too.

The main server.js file contains the logic to fetch data from poeditor API inside /translations route.

Image for post
server.js

The logic to format the data is inside /helpers/poeditor.js file. It makes use of loadash to construct nested objects out of flattened data. If your data is already flat, it will give the output accordingly.

As mentioned earlier, to format the data into its original structure it makes use of ‘content’ property from poeditor’s API response.

Image for post
/helpers/poeditor.js

All of these setup should be enough. Now spin up the NodeJS and vue development server, it will work like magic.

The beautiful code snippets for this article are generated using RamroCode.