
Prerequisites
- VueJS project on github
- Aws account
Steps
- Create AWS bucket
- Configure bucket for static hosting
- Buildspec file
- Create and configure code pipeline
Create AWS bucket
Create a bucket with your domain name.

The bucket name must be unique.

After the bucket is created; go to its detailed view. Click on the properties tab then select “Static website hosting”. Select the first option “Use this bucket to host a website”.

Fill out the information as shown in the screenshot above and hit save.
As Vuejs is a single page application the error is also handled by index.html.
Configure bucket for static hosting
Next: the bucket needs to be accessed by other AWS services like CodeBuild, Lambda etc. For this purpose bucket policy needs to be configured.

Under permissions goto “Bucket Policy” tab which contains a blank editor. Copy and paste the following configuration into it.
Replace the ARN under Resources with your bucket ARN.
ARN: Amazon Resource Name
Alternatively, beneath the editor click on the “Policy generator” link and generate the policy.
This finishes the S3 bucket setup.
Buildspec File
Before diving into the AWS CodePipeline, let’s talk about the buildspec file. Create a “buildspec.yml” file at the root of your Vuejs project and paste the following contents.
This section is just for understanding. Skip if you like.
Here you can see 4 phases:
install: Includes commands to run during installation. It installs/upgrades npm, pip and awscli required for further process.
pre_build: Commands to run before build. Install the dependencies by running
npm installbuild: command to build Vuejs project.
post_build: command to sync
distdirectory with S3 bucket. You need to change the build directory if the project has been built somewhere else. $S3_BUCKET is the ENVIRONMENT variable which we will configure later.
Create and configure AWS CodePipeline
It is the crucial step where we connect the GitHub repo with the S3 bucket and configure codepipeline for automatic deployment. At this step make sure you have pushed the latest changes to Github.
I have mentioned only Github here. As of now CodePipeline supports Github and BitBucket.
The pipeline for Vuejs project would be pretty simple; with two phases.
- Source: Gets the latest commit from Github’s appropriate branch
- Build: Install dependencies, build project and sync with S3
Navigate to AWS CodePipeline and click Create pipeline.

At the create pipeline wizard, input pipeline name and service role.

Expand the advanced tab.

Artifact store: Custom location
Bucket: select the recently created bucket
Click Next

Select GitHub. It may ask you to login and grant access. Then click connect.

Select the appropriate Repository and branch. Leave GitHub Webhooks as default and click Next. Learn more about Github webhooks here.

At “Add build stage”, select AWS Codebuild. Then click on “Create Project”. It will open a project creation wizard on a new window.

On the Project creation form. Fill up the values as follows.
- Project name: your project name
- Environment image: Managed Image
- Operating System: Ubuntu
- Runtimes: Standard
- Image: aws/codebuild/standard:4.0
- Image version: Always use the latest image for this runtime version
- Environment type: Linux
- Service role: New service role
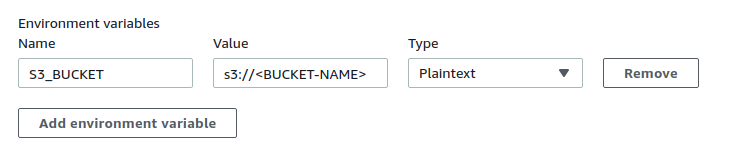
Expand the Additional configuration. Scroll to Environment variables. Insert S3_BUCKET on name field and name of the bucket on value field. That value will be used by the buildspec.yml file created earlier.
Scroll and select “Use a buildspec file” on Buildspec section.

Click Continue to Codepipeline. It will then close the window and return back to CodePipeline configurations with a success message.

Skip the add deploy stage. Finally, review your configurations and click Create Pipeline.

Now you should see the source and build stage being executed.
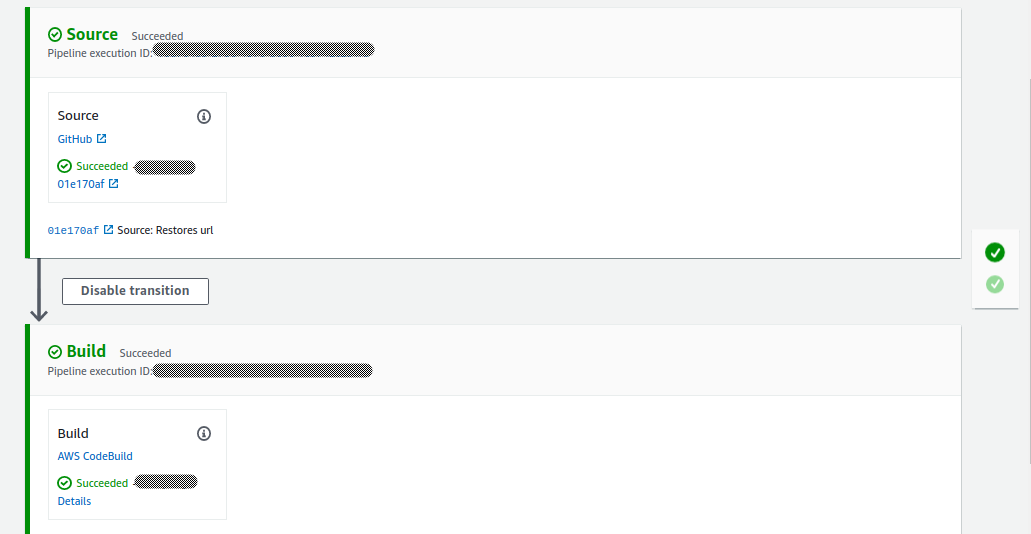
In order to test the automatic deployment, push new commits to GitHub and wait for source and build phases to complete.
