Bibhuti Poudyal is the co-founder and CTO of The Value Crew. During his past 5+ years of software development, he has worked with many people & companies across the globe. He believes building successful software requires not only code & designs but also positive emotions & empathy. Bibhuti spends his free time contributing to open source, reading, cycling, and rarely cooking.
This article demonstrates a straightforward approach to Continuous deployment using GitHub Actions. It will work for every type of backend & frontend i.e. Nodejs, Ruby, Python, PHP, Vue, React, Angular etc. The approach is simple, free of cost & more importantly it can be used on production. It’s an intermediate level article; for those who […]
SHARE ARTICLE
This article demonstrates a straightforward approach to Continuous deployment using GitHub Actions. It will work for every type of backend & frontend i.e. Nodejs, Ruby, Python, PHP, Vue, React, Angular etc. The approach is simple, free of cost & more importantly it can be used on production.
It’s an intermediate level article; for those who are manually deploying application to server but struggling to automate it. Also, basic knowledge of GitHub Actions is expected.
These are two major steps
Deployment using SSH & GitHub
Automate step 1
Deployment using SSH & GitHub
This is the normal deployment strategy i.e. how you deploy applications manually via SSH & git.
Connect to server via SSH
Create SSH Key
Add public key to GitHub’s deployment keys
Clone Repo to server
Setup project
Run project
At this point, the project should run smoothly. Next step is to automate the same process via GitHub Action.
Automate Step 1
1. Configure necessary values
Go to GitHub Repo ⇒ Settings ⇒ Secrets
Create 3 New repository secrets
SSH_PRIVATE_KEY_DEV : SSH private key from server
HOST_DEV : Hostname of server
USERNAME : server username
eg: if you use ssh [email protected] to access server. root is USERNAME and xx.xx.xx is HOST_DEV.
2. Create YML file
Inside project directory create a yml file deploy.yml at
Example 1: Auto deploy Vue/React projects into server
Example 2: Auto Deploy pm2 based Nodejs application to server & restart pm2
Push the changes to GitHub on dev or some other specified branch. Head over to GitHub ⇒ Your repository ⇒ Actions Tab.
There you will see the workflow your recently executed workflow-run. In case of success/failure it will show respective logs. Again, try some changes and push it to GitHub. It will update automatically.
As you have noticed, the yml script uses appleboy/ssh-action@master to make the task easier. Its a bit slower though. If you want faster alternative, same task can be done manually. Here’s a nice article about it.
Another thing to ponder over is GitHub action pricing. Free plan come with some limitations. You can find more details here.
Hence, this approach does exactly the same thing as you did on Step 1 or the stuffs you used to do manually. It access the server via SSH. Credentials: username, host & SSH private key are provided earlier on
GitHub → Settings → Secrets
Then it executes specified command to build project & restart server/process manager if needed.
SHARE ARTICLE
Subscribe and get our latest Blog Posts
right in your inbox
Instagram Basic Display API integration with NodeJS
Bibhuti Poudyal
July 30, 2021
5 minutes min read
This article will demonstrate how Instagram can be integrated with your system. Specifically, it explores a mechanism to show users’ Instagram posts on your app/website. At time of writing this article, instafeed.js provides similar functionality. However, it depends on Heroku’s free service to refresh tokens. After Heroku updated its pricing policy, it kind of became expensive. This approach […]
SHARE ARTICLE
This article will demonstrate how Instagram can be integrated with your system. Specifically, it explores a mechanism to show users’ Instagram posts on your app/website.
At time of writing this article, instafeed.js provides similar functionality. However, it depends on Heroku’s free service to refresh tokens. After Heroku updated its pricing policy, it kind of became expensive. This approach serves as self-hosted alternative.
Before going further, please head over to Facebook Developers page and go through the overview. It will be easier to grasp concepts further.
App ID is required on frontend only; backend requires both ID & secret. Since App secret can’t be shown to users, it’s kept as an environment variable on server.
App ID, secret & Redirect URIs
Also add your frontend application’s URL to Valid OAuth Redirect URIs. localhost with https will work. More better, hosting static app on GitHub pages will do.
Frontend
Use this piece of code on static frontend site to get Short-lived access token. Short-lived access tokens are valid for 1 hour, but can be exchanged for long-lived tokens(will do later on server side).
Since our goal is to fetch user related info & their Instagram photos, scopes are set to user_profile & user_media.
It will open authorization window on a new tab. After being authorized it will redirect to /insta page(as configured on above code) with a query parameter containing code. That code will be used to fetch short lived access token on backend.
Next, the code & redirect URI are sent to server for further processing.
Backend
It’s assumed that backend has an endpoint for receiving code & redirect URI via any HTTP method.
Now, the next step is to get Short-Lived-Access-Token. The code is self-explanatory.
JSON based POST won’t work. So form based request is sent via request.
After Short-Lived-Access-Token is obtained, it needs to be exchanged with Long-Lived-Access-Token.
As mentioned earlier, short-lived token has 1 hour validity. Similarly long-lived token has 60 days validity. i.e. the token just stored on DB needs to be refreshed before it expires.
3. Setup Token Refresh Service
To refresh token every 60 days, a cron job seems suitable. node-cron will serve best for this purpose.
Inside instaRefresh.cron file, it gets old token from DB and replaces it with new one.
Hence, this cron job will automatically refresh access tokens.
4. Fetch data
Finally, its time to fetch data from Instagram. We will be making use of the accessToken stored on DB. To learn more on what kinds of data can be fetched, visit this page.
Access tokens are app-scoped (unique to the app and user pair)
Here, we will be fetching media uploaded by user. Then Filter it and obtain images only.
Platform Rate Limits
Instagram API has limit on number of API calls. More details can be found here .
One way around this issue is to cache API responses. For this particular scenario, the image URLs can be saved to database every, lets say, every 3 hours; using cron-jobs.
Instead of calling Instagram API directly, images can be served from DB; as a cache. However, this particular case may not be feasible for every use case.
I hope this guide will help to integrate Instagram Basic API on NodeJS based application. If you have more robust alternative, please mention on the comments below.
OTP verification has become a common feature of modern web & mobile application. Either it be user registration, multi-factor authentication or password change mechanism, OTP verification seems to be perfect choice. Also SMS or phone call verifications are considered more secure & reliable than email links. In this article I will explain about Vonage’s Verification […]
SHARE ARTICLE
OTP verification has become a common feature of modern web & mobile application. Either it be user registration, multi-factor authentication or password change mechanism, OTP verification seems to be perfect choice. Also SMS or phone call verifications are considered more secure & reliable than email links.
In this article I will explain about Vonage’s Verification API integrated with Nodejs(express) server. It also provides OTP feature, so you don’t have to reinvent the wheel every time. You can check more info here.
Lets begin with a very basic express server.
The server.js file contains a very basic web server with 2 routes.
/api/request-token
/api/verify-token
Business logic for each endpoint are inside vonage.service.js. The service file uses @vonage/server-sdk; official JS library for Vonage API. Vonage API Key and API Secret can be obtained on dashboard once subscribed for the service.
Service file has 3 methods: for requesting, verifying and cancelling token.
At first the vonage object is initialed with apiKey and secret obtained from Vonage. Then there are two pieces for this entire workflow: request code & verify. Lets dive into each of them.
Request OTP
The one job of this method is to send OTP token to the given phone number. Vonage verification service handles it in a cool way. As per the time of writing this article, it sends SMS to given number. If OTP isn’t verified within that time, it calls the number either on SIM card or in my case it called me on Viber. When you get the OTP code you can then send it to API for verification. Process seems straightforward but it can be tricky during implementation.
Some of the caveats I ran into:
– Can’t send concurrent OTP to a phone no within 30 seconds interval.
– Can’t cancel the OTP request multiple times. If done, it will throw error repeatedly.
Considering these points lets move forward with code. First of all lets complete the requestCode method in vonage.service.js file.
The method takes phone number and returns the most important thing request_id.
Normally you don’t have access to OTP code sent by Vonage. If you need please visit their pricing section.
If you get request_id on response, it was successful request, else there were some errors.
Another piece of this mechanism is the cancel token request. There may be cases which requires OTP request to be cancelled. One of the prominent reason would be: Vonage has 5 minute limit for OTP expiry. In real world, it’s a very long wait. Worst case: who waits for 5 min to receive a OTP 😂
So you may need to cancel the pending request and re-send another OTP. The code to cancel request looks something like this.
It’s a pretty straightforward code that requires the OTP’s request_id to cancel it. As you may have seen, request_id is the only way to track your OTP. So, store it safely.
These 2 methods would be sufficient to request an OTP. Now lets move onto server.js to implement these methods.
First of all check for the presence of phone number. Then remove all the present whitespaces . Sometimes phone number are in weird format(+12 345 678 890). It may cause issue for services like Vonage. It requires the country code though.
Basically, the code above requests for OTP via vonage.service.js. In case of success onOtpSuccess function is executed, in case of error onOtpError is executed. In case of concurrent OTP request to same number within 5 minutes, Vonage throws error with status 10. That case is handled by cancelling the OTP with its request_id and resending the request. If it fails again, its flagged as error.
Up to this point you have seen how to request OTP, how to cancel it (if required). Another piece of the puzzle is verifying the OTP.
Verify OTP
To recall: we have 2 files server.js, vonage.service.js and request_id is the only way to track your OTP.
The logic for verification is quite straightforward unlike OTP request mechanism. First lets look at vonage.service.js for its implementation.
Verification is done via
request_id which is store on DB or received from user
OTP code which user receives on phone via SMS or call.
Successful verification will return the result with status 0.
Moving onto server.js file, the verifyOtp method is used like this.
Here, both OTP and request_id is being retrieved from API request. It may depend on your implementation.
In this way, you can send OTP code to user’s device and verify it using Vonage’s verification API. You can find a basic implementation on Vonage’s JS guide too. This article serves a more detailed guideline to implement it on Express JS server.
SHARE ARTICLE
Subscribe and get our latest Blog Posts
right in your inbox
Serializers allow complex data like database query results and model instances to be converted to native Python data types which can then be easily rendered into JSON content types. It also provides deserialization, i.e. validating and then converting JSON data back into complex types. Multiple SeriaizerMethodField() needs to access the same resource in the Database. […]
SHARE ARTICLE
Serializers allow complex data like database query results and model instances to be converted to native Python data types which can then be easily rendered into JSON content types. It also provides deserialization, i.e. validating and then converting JSON data back into complex types.
Multiple SeriaizerMethodField() needs to access the same resource in the Database. One easier way is to get the resource from DB at each get_<fieldname> method. It works fine but getting the same resource again and again from DB is not the performant solution. Instead, a “get_resource” function can be written to access the resource once and use it throughout the serializer. At each get_<fieldname> method existence of the resource is checked. If found it is used else the “get_resource” function is called.
Here, the ‘get_translation’ function gets the resource i.e. ‘translation’. Other methods ‘get_title’, ‘get_slug’ and ‘get_excerpt’ uses the method to the share common resource.
SHARE ARTICLE
Subscribe and get our latest Blog Posts
right in your inbox
Shared custom response from Rails controller action
Bibhuti Poudyal
January 10, 2021
3 minutes min read
This post explains my recent experience regarding the endevour of implementing shared custom response from multiple controller actions in Ruby On Rails. Lets say we have a controller. Inside it lies the following actions: action_1, action_2, action_3 and action_4. All of these actions would respond with custom response and for convenience the responses will be in JSON format. We need […]
SHARE ARTICLE
This post explains my recent experience regarding the endevour of implementing shared custom response from multiple controller actions in Ruby On Rails.
Lets say we have a controller. Inside it lies the following actions: action_1, action_2, action_3 and action_4. All of these actions would respond with custom response and for convenience the responses will be in JSON format. We need to send the same custom response from different actions, thus the response needs to be shared.
Such scenarios my arise when:
We need to validate some data before proceeding further.
The logic of the controller depends on the value of supplied params. If params is not present, controller needs to respond with respective message. etc…
The following text explains all the approaches which I tried for implementation of such requirements. And why one is better that the other.
Attempt 1
This approach uses a shared method to perform extra logic and provide a Boolean response which determines the action’s response. The logic is performed in res_n method and the response is returned from controller action.
As we can see, it has a lot of code duplication. The success response may be different but the error response need to be repeated in all actions. It violated the ruby’d DRY principle.
Attempt 2
This approach minimizes the code redundancy by moving the common error response to res_n methods. As you may have noticed the built-in method performed? is used. This method returns true if render method has already been invoked earlier. This way we prevent render method being called multiple times. The code is more simpler and cleaner than the first approach.
Attempt 3
This approach is the best among the previous two approaches. With a lot of research on code refactoring on this scenario I stumbled on this solution. It automatically prevents render method being called multiple times and make code more shorter, cleaner and easier than the 2nd approach. It uses built-in controller method before_action . This method gets called before each time a controller’s action is executed. The control of the program never enter the action method if it is returned from before_action method.
Conclusion
In this post, I have tried to explain the problem I faced during my ROR internship. And how I manged to solve it, trying different approaches, improving each time. Although the last attempt seems to be the best one, there may be scenarios where we need to implement the techniques of former approaches too.
SHARE ARTICLE
Subscribe and get our latest Blog Posts
right in your inbox
Automate Vue Js deployment to AWS S3 bucket with CodeBuild
Bibhuti Poudyal
January 10, 2021
5 minutes min read
Deployment to your AWS S3 bucket can be a hassel. Automate this process with CodeBuild.
SHARE ARTICLE
Prerequisites
VueJS project on github
Aws account
Steps
Create AWS bucket
Configure bucket for static hosting
Buildspec file
Create and configure code pipeline
Create AWS bucket
Create a bucket with your domain name.
The bucket name must be unique.
After the bucket is created; go to its detailed view. Click on the properties tab then select “Static website hosting”. Select the first option “Use this bucket to host a website”.
Fill out the information as shown in the screenshot above and hit save.
As Vuejs is a single page application the error is also handled by index.html.
Configure bucket for static hosting
Next: the bucket needs to be accessed by other AWS services like CodeBuild, Lambda etc. For this purpose bucket policy needs to be configured.
Under permissions goto “Bucket Policy” tab which contains a blank editor. Copy and paste the following configuration into it.
Replace the ARN under Resources with your bucket ARN.
ARN: Amazon Resource Name
Alternatively, beneath the editor click on the “Policy generator” link and generate the policy.
This finishes the S3 bucket setup.
Buildspec File
Before diving into the AWS CodePipeline, let’s talk about the buildspec file. Create a “buildspec.yml” file at the root of your Vuejs project and paste the following contents.
This section is just for understanding. Skip if you like.
Here you can see 4 phases:
install: Includes commands to run during installation. It installs/upgrades npm, pip and awscli required for further process.
pre_build: Commands to run before build. Install the dependencies by running npm install
build: command to build Vuejs project.
post_build: command to sync dist directory with S3 bucket. You need to change the build directory if the project has been built somewhere else. $S3_BUCKET is the ENVIRONMENT variable which we will configure later.
Create and configure AWS CodePipeline
It is the crucial step where we connect the GitHub repo with the S3 bucket and configure codepipeline for automatic deployment. At this step make sure you have pushed the latest changes to Github.
I have mentioned only Github here. As of now CodePipeline supports Github and BitBucket.
The pipeline for Vuejs project would be pretty simple; with two phases.
Source: Gets the latest commit from Github’s appropriate branch
Build: Install dependencies, build project and sync with S3
Navigate to AWS CodePipeline and click Create pipeline.
At the create pipeline wizard, input pipeline name and service role.
Expand the advanced tab.
Artifact store: Custom location
Bucket: select the recently created bucket
Click Next
Select GitHub. It may ask you to login and grant access. Then click connect.
Select the appropriate Repository and branch. Leave GitHub Webhooks as default and click Next. Learn more about Github webhooks here.
At “Add build stage”, select AWS Codebuild. Then click on “Create Project”. It will open a project creation wizard on a new window.
On the Project creation form. Fill up the values as follows.
Project name: your project name
Environment image: Managed Image
Operating System: Ubuntu
Runtimes: Standard
Image: aws/codebuild/standard:4.0
Image version: Always use the latest image for this runtime version
Environment type: Linux
Service role: New service role
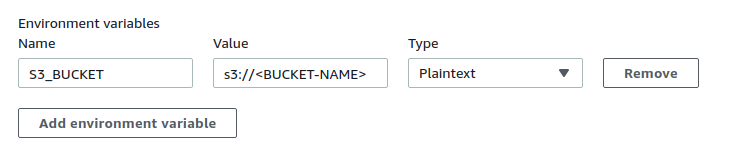
Expand the Additional configuration. Scroll to Environment variables. Insert S3_BUCKET on name field and name of the bucket on value field. That value will be used by the buildspec.yml file created earlier.
Scroll and select “Use a buildspec file” on Buildspec section.
Click Continue to Codepipeline. It will then close the window and return back to CodePipeline configurations with a success message.
Skip the add deploy stage. Finally, review your configurations and click Create Pipeline.
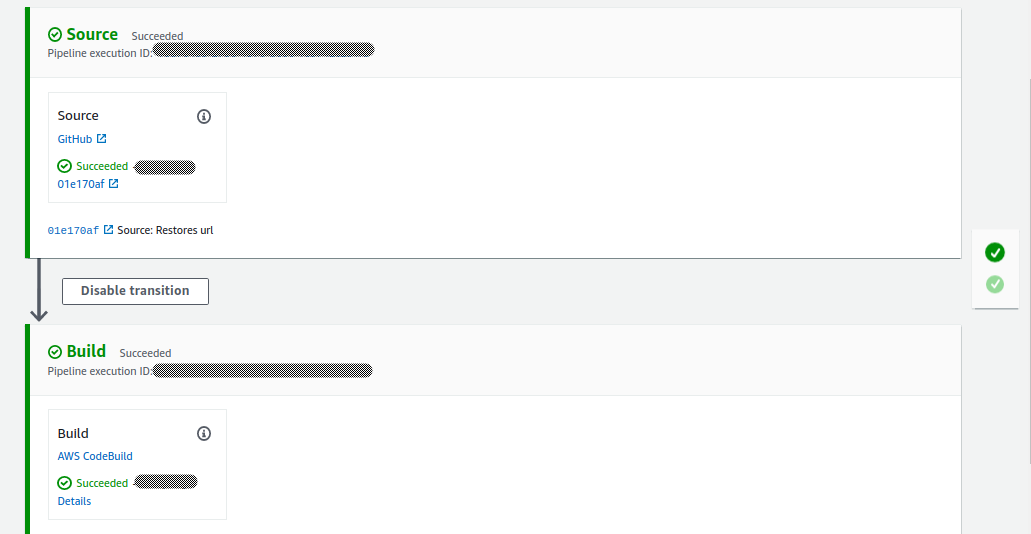
Now you should see the source and build stage being executed.
In order to test the automatic deployment, push new commits to GitHub and wait for source and build phases to complete.
SHARE ARTICLE
Subscribe and get our latest Blog Posts
right in your inbox
Its a very basic requirement for applications to delete data item from the database after it has no use. Certain information like verification code, one time passwords, gift coupons, activation keys etc. don’t need to be stored once used. Typically, a cron job can be scheduled to get rid of such data items at certain […]
SHARE ARTICLE
Its a very basic requirement for applications to delete data item from the database after it has no use. Certain information like verification code, one time passwords, gift coupons, activation keys etc. don’t need to be stored once used. Typically, a cron job can be scheduled to get rid of such data items at certain intervals. But modern databases have this feature built onto the system.
Dynamodb provides a TTL field to achieve this goal. Dynamodb docs states that
Amazon DynamoDB Time to Live (TTL) allows you to define a per-item timestamp to determine when an item is no longer needed. Shortly after the date and time of the specified timestamp, DynamoDB deletes the item from your table without consuming any write throughput.
At first, it looks like a cool feature. Allows you to free up your database by automatically deleting the old records. Cool, isn’t it ?
But if you are someone(like me) who instantly gets amazed and implements the feature right away without going into depth, you are likely to face the problems I did.
Here are few things to be considered before implementing this feature on your application.
TTL data type and value
The TTL field must be a number DataType. And the value should be in seconds i.e. timestamp in Unix epoch time format in seconds. In case of any other format, the TTL processes ignore the item.
TTL precision
This feature can work only if your task requires hour precision, but not minute or seconds precision.
As Dynamodb docs states
DynamoDB typically deletes expired items within 48 hours of expiration. The exact duration within which an item truly gets deleted after expiration is specific to the nature of the workload and the size of the table. Items that have expired and not been deleted will still show up in reads, queries, and scans.
In my case I was working with verification codes, sent as SMS, which needed to expire after XX minutes. For this TTL didn’t work as it didn’t guarantee minute precision, So I had to manually store timestamp and check for expiration within the lambda function.
DynamoDB is a NoSql database and models data in Table-Items-Attributes structure. It allows data-item to be schema less. It’s a huge advantage as it allows you to write data in any format as desired. Even if structure of your data changes eg: a new field is added/deleted at later point of time, it adapts to […]
SHARE ARTICLE
DynamoDB is a NoSql database and models data in Table-Items-Attributes structure. It allows data-item to be schema less. It’s a huge advantage as it allows you to write data in any format as desired. Even if structure of your data changes eg: a new field is added/deleted at later point of time, it adapts to it well.
With freedom of schema flexibility, data format inconsistency comes alongside. Even if database provides the power of flexibility, the schema shouldn’t change to that point at which it affects the performance of the system. It becomes an overhead to write separate business logic to manage the data inconsistency. It’s a good idea to resolve this issue on database layer.
I came up with a simple, yet effective solution to solve this problem. It worked pretty well in my scenario, hope it works well in yours too. For demonstration purpose Nodejs runtime have been used for business logic.
Here is the dead-simple schema for all of your DynamoDB tables.
As you can see this schema provides all the required data and metadata fields. The data field will contain the core information and others are metadata.
Lets explain major fields one by one.
id
id is the primary key to uniquely identify each item in a table. As DynamoDB doesn’t provide automatic generation of this field, the developer is required to generate it manually. The uuidjs library seems to be the best fit.
v1(version 1) of uuid guarantees that it is always unique even if everyone is doing millions of database insertions/sec. An identifier has been pre-appended so that its more unique and easier to separate from others(its optional though).
The data field is a map type attribute. Maps are enclosed in curly braces({ … }). It is similar to a JSON object. There are no restrictions on the data types, and the elements do not have to be of the same type.
example:
The structure is similar for both user and the product. Core data lies inside the data field.
Make sure that the value inside data field isn’t too inconsistent to manage. That inconsistency needs to be handed at either back-end or via front-end code. In case of very complicated inconsistency, the whole idea of this schema becomes useless.
timestamps
The timestamp field provides information on when the data was created and updated. For createdAt field, a timestamp needs to be inserted during data creation. For updatedAt field a simple function can be used to wrap the update logic. The function then automatically appends updatedAt field each time. Here’s a simple one which I wrote for my use
For implementing the soft delete functionality, you can use the deletedAt field. In order to track the item’s author createdBy field comes in handy.
This is my solution to tackle the minor changes in database schema while working with NoSql databases. I prefer to keep very little amount of data format inconsistency and normalize it on front-end during data rendering. If the amount is very high, its best to write a back-end script to normalize the data.
If you find any flaw, have some improvements or you have a different or more cleaner approach, please share in the comments below.
SHARE ARTICLE
Subscribe and get our latest Blog Posts
right in your inbox
Build a Snake game in 110 Lines of Code using just Html and JS.
SHARE ARTICLE
In this article, I will build a simple snake game in JavaScript from scratch. The player can control the snake by the keyboard. Whenever the snake collides with food(a red circle), it gets 1 point and food moves to a random position.
You can view the finished application here. And the source code is here.
Demo
The requirements for this application are basic knowledge of HTML, JavaScript, and some prior knowledge of HTML canvas.
The file structure of the application looks something like this:
index.html: contains the HTML code
script.js: contains the main logic of the application
index.html file
The canvas is given the height and width of 500px and border-style ‘solid’ so we can view it clearly. It is given the id ‘canvas’ to reference it from script.js file That’s all for HTML. Open it in your browser and you will see an empty white box. That’s our canvas.
Now let’s move on to the scripting part. Initially, we get reference to the canvas so that we can draw on it.
Reference canvas in HTML from JavaScript
In order to use canvas, we get reference to the context of the canvas. The parameter ‘2d’ is passed, which specifies that we are working in 2D. Next, we declare some variables which will hold our snake, food, score, direction, speed etc. Information of each variable is in the comments.
Basic JavaScript setup for the game
Now we have our variables ready, we initialize our snake. Initially, snake array is empty. It’s supposed to contain the coordinates of the snake. Let’s do that now.
Re-render the screen every 100 milliseconds
The for loop goes from 0 to length. Each time it adds a circle to the snake array so that the circle lies exactly to the left of the previous circle. For that, the x-coordinate of the circle is decreased each time by (size*2) and the y-coordinate is kept constant. After the snake is made ready we call the setInterval function which takes two parameters: a function to call each interval and an integer number which is the interval in milliseconds. In our case, it’s 100. i.e the function draw is called once in every 100 milliseconds.
The draw function is the main part of our program where the magic happens. In every 100 milliseconds, the draw function is invoked which clears the canvas, updates the position of the snake based on its direction, and redraws it. This happens so quickly that we don’t even notice. At the same time, it checks the collision of snake and food and updates the score too.
the draw function
ctx.clearRect() method clears the canvas before redrawing. The successive for-loop loops over the circles of the snake from its tail to head (from the last index to the first index). If the current index is not the head, it sets it to its preceding circle. i.e. the last circle takes the position of second last circle, second last takes the position of third last, and so on… so that the snake seems as if it’s moving.
If the current index is head, first it checks the direction(at switch case) and increases the coordinate of the circle according to that direction.
Right: increase x-coordinate
Left: decrease x-coordinate
Up: decrease y-coordinate
Down: increase y-coordinate
After adding and subtracting the coordinate it should be drawn on the canvas so that the player can see the moving snake. The code below draws each circle of the snake with its updated coordinates.
draw snakes with arc
Now the snake is drawn on the canvas. But it’s not the only thing to draw, we still need to draw the food and score. Drawing the food is similar to drawing the circles of the snake. In case of food, we fill it with red color. The next issue is checking the collision. The function checkCollission() does the job and returns a Boolean value. It takes two circles as its parameter, in our case, it’s the snake’s head and the food.
Check for collision
The logic for the above function is quite simple. It what we studied in our school. First, we take the distance between the central points of two circles and compare it with the sum of their radii. If it is greater: no collision; else: they collided. The illustration will clear the concept.
check distance between centers of two circles to detect collision
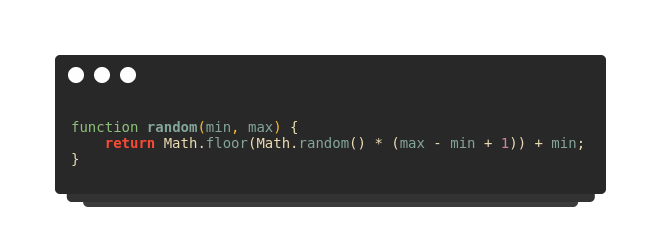
If checkCollission() returns true, first the score is increased and the food is placed on any random position between 0 to width/height of the canvas. The random function takes two parameter min, max, and gives a random number between them.
random function
Now we have come to the end. The last piece of the puzzle is the keydown event handler. We need to control the direction of the snake according to the keyboard button pressed.
handle keyboard events
The onkeydown handler is invoked whenever a key is pressed down. Then we check if the key is right, left, up or down arrow and assign the respective direction. 37, 38, 39 and 40 are the keyCode (ASCII value) for left, up, right and down arrows. Now save the file and open it in your browser.
The code doesn’t work yet. It’s because, for the code to work the timer should start, which we haven’t done yet. As you have noticed, the timer is set in init() function. So call the init function at the last line of your code, save it, and refresh the browser. You can see a moving snake that you can control with the keyboard’s arrow keys.
Happy Coding !
SHARE ARTICLE
Subscribe and get our latest Blog Posts
right in your inbox
Internationalization is a basic feature for web apps having users from different corners of the world. vue-i18n makes the process very smooth to implement internationalization into VueJs web apps. Poeditor is another tool that provides a smooth translation workflow.
SHARE ARTICLE
Internationalization is a basic feature for web apps having users from different corners of the world. vue-i18n makes the process very smooth to implement internationalization into VueJs web apps. Poeditor is another tool that provides a smooth translation workflow.
Recently I ‘d a chance to migrate the Vue application (with local translation data) to make it work with Poeditor’s API.
In case you don’t know about poeditor. It provides a smooth translation workflow. And also
The technique mentioned in this article works for this particular scenario:
You already have translation working from local translation files
You don’t want to change any of the current workflow
You want to take advantage of all the cool features of poeditor
This article suggests an architecture that perfectly fulfills the above requirements.
Vue.js + Node.js Proxy + Poeditor API
The first step would be to import the existing vue-i18n’s JSON translation file to poeditor.
Import current translation to poedditor
As you may have noticed, the import process flattens the nested JSON object. If your translation data is only 1 level deep, this shouldn’t be an issue. In case of nested data, note the context below translation terms. It will be used later to gain the original nested structure.
Now lets look at the changes in Vue application. This solution is a derived version of vue-i18n’s Lazy Loading guide.
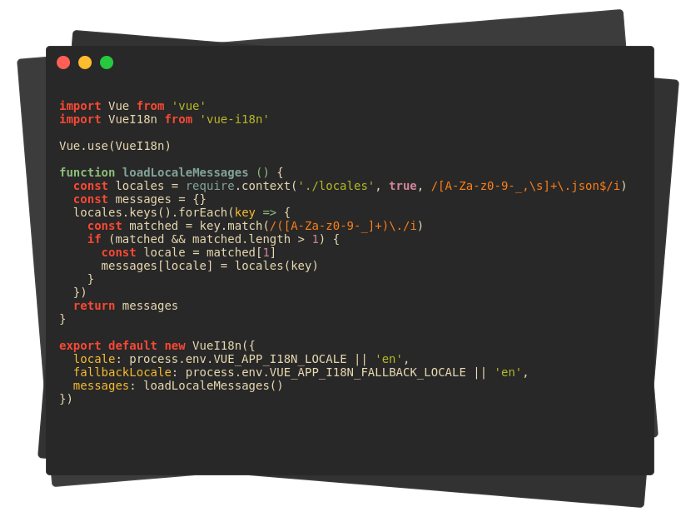
This is how default i18n file looks like, before the change.
The current structure needs to be changed in order to fetch data from the API. And it needs to export two things
the i18n instance
loadLanguageAsync function
The loadLanguageAsync function loads translation data from the server and sets the data and locale accordingly. setI18nLanguage sets i18n’s locale and updates lang attribute of html tag with new translation. silentTranslationWarn property enables/disables console warnings.
i18n.js file after the required changes:
When we have the functions ready we need to decide a best place to call the function. If your language depends on the URL, you should probably follow the vue-i18n’s Lazy loading guide; it asynchronously loads the translation before each route change according to route params.
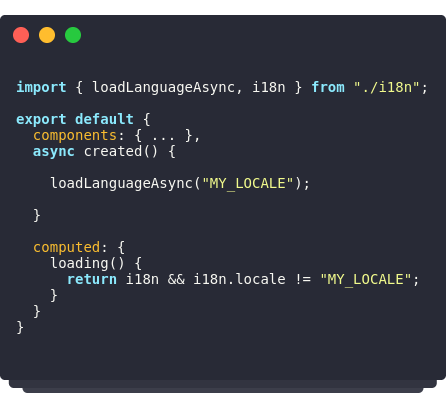
For our case, we need to get the translation only once when the app loads. So App.vue seems to be the best place to call this function.
at App.vue
Inside the created function new translations are loaded. The loading computed property tells whether the translation has been loaded or not. You can use this property to show loading message until the translation loads.
Usage of loading computed property at App.vue
That should take care of everything on the front end.
Backend Proxy
For back-end I have chosen NodeJS and Express as it allows to create API very quickly.
The server will be responsible for:
Request data from poeditor
Format locale data to match vue-i18n structure
The reason for using proxy: Poeditor REST API is protected with CORS. So it doesn’t allow frontend application to request data. Moreover, the data needs to be formatted which can be an overhead on the browser. Formatting on the server is faster and it can be cached too.
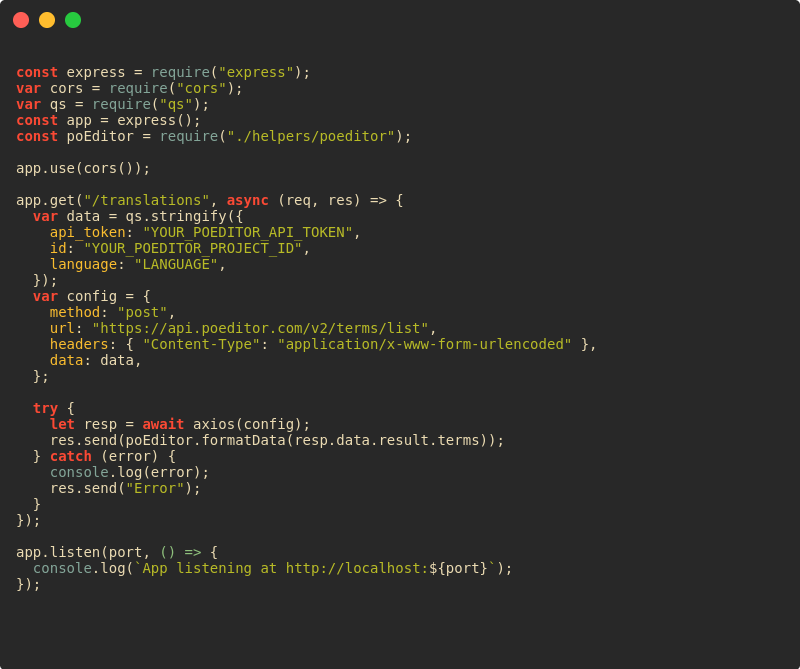
The main server.js file contains the logic to fetch data from poeditor API inside /translations route.
server.js
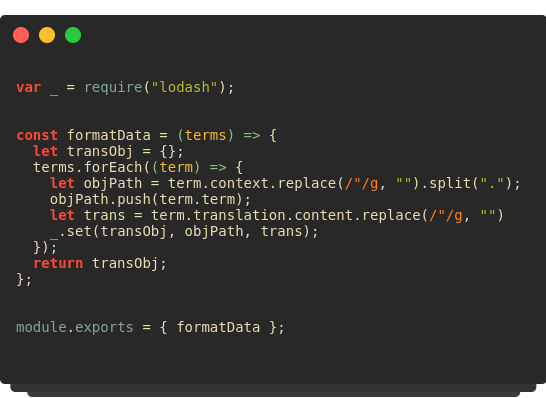
The logic to format the data is inside /helpers/poeditor.js file. It makes use of loadash to construct nested objects out of flattened data. If your data is already flat, it will give the output accordingly.
As mentioned earlier, to format the data into its original structure it makes use of ‘content’ property from poeditor’s API response.
/helpers/poeditor.js
All of these setup should be enough. Now spin up the NodeJS and vue development server, it will work like magic.
The beautiful code snippets for this article are generated using RamroCode.
SHARE ARTICLE
Subscribe and get our latest Blog Posts
right in your inbox


 needs to access the same resource in the Database. […])